

From Script to Paperback and eBook: Publishing my Book on KDP
From Word file to published book: here’s how I turned my latest fairy tale into both a paperback and Kindle eBook on Amazon KDP. With Step-by-step formatting, cover design, and pricing considerations.

Every fiction book has a journey, every non-fiction self-help book has a transformation - and so does every manuscript. Relaunching my first fairy tale, I documented the trip from a simple Word file on my computer all the way to Amazon’s Kindle Direct Publishing (KDP) platform.
In this publishing walkthrough, I’ll show you how I prepared the paperback and afterwards what I learned creating the eBook version along the way up to clicking on “Publish”.
Step 1: Complete the Script
I wrote the entire manuscript in Microsoft Word, carefully formatted for print in a 5.5” x 8.5” size. For paperbacks, that means thinking like a traditional typesetter:
The chapters always begin on the right-hand page, which adds some “empty pages” throughout the document.
The Table of Contents (TOC) must be adjusted to match the actual pagination. A potential foreword is not listed there.
The front matter including the title page, a copyright page and a potential dedication sits before the numbered chapters.
For the digital eBook, I created a second Word file without those empty pages to avoid scrolling over emptiness.
My 12 chapters all started with an illustration below the chapter name. That was a bit tricky with the image size - easy for the paperback layout to fill the dimensions. I wanted to ensure that the chapter name remains on just one line above the image also for the ebook. As a consequence I decrease the image size that it suits both the paperback and eBook formats on most typical form factors.
Step 2: Create the Paperback PDF
KDP requires a print-ready PDF format. Thankfully, this part was simple within Microsoft Word (or alternatively Google Docs):
Save the manuscript as a PDF using Print Quality.
Double-check margins, fonts, and page size match the chosen trim size (in my case, 5.5 x 8.5 inches / 140 x 216 mm).
That file becomes the upload for the paperback interior.
This quality was good enough for KDP even with my illustrations - no need to have an Acrobat Pro version or any other tool.
One quick word about ISBN numbers: I bought my own in a block of ten from the authority in Australia (only one organisation per country) so I can use the same book also for being printed at Draft2Digital or IngramSpark. You can also use an ISBN number from Amazon but can’t reuse the same on another distribution channel.
Step 3: Design the Covers
Covers were trickier because paperbacks and eBooks need different dimensions:
eBook cover: 1600 x 2560 pixels is the typical size with a tall aspect ratio that displays well across Amazon, Apple Books, and other stores. KDP requires a JPG image, for sharing on other channels I also created the better quality of a PNG image.
Paperback cover: it must match the book’s trim size as defined (in my case 5.5 x 8.5 inches). I also created the back side as separate PDF to attached it all together as a PDF book to sell it separately.
Full wraparound cover: required for the paperback including the spine. The dimensions are based on the page count (mine was 92 pages); KDP provides a template once you enter those details. If you bring your own ISBN number, you can integrate and let KDP know in the steps.
I designed all three versions in Canva as separate documents for easy copy and paste of the requirement elements. Sure, those familiar with the Adobe Creative Suite would use Photoshop or Acrobat Pro.
A quick side remark: if you want to have a free chapter of your book as a freebie download in exchange of a reader’s email address, the paperback cover PDF is quite handy stating with “free chapter copy” on the title.
Step 4: Upload to KDP
Once the files were ready, I logged into my KDP dashboard and started the upload process:
Entered book details (title, subtitle, author name, imprint).
Selected trim size, paper type, and binding options (I went for premium colour, which increases cost but looks vibrant for illustrations).
Uploaded the interior PDF and cover PDF files, adding a comment about AI usage for the book (text, translations, images).
Define the main market (Amazon.com) and the pricing per market: for paperback the net price without sales tax is given while the gross including GST/VAT etc. is calculated.
That means fiddling around for countries showing the gross price (most expect US, UK and Ireland) to have the proper rounded price ending with 99 cents.
At this point, the paperback version was ready for review and publishing. Done!
Step 5: Create the Kindle eBook
The process begins in the same KDP dashboard. After finishing the paperback draft or even after publishing it, I simply clicked “Add Kindle eBook”:
Title, subtitle, and contributors transfer across automatically.
The description can be the same as your paperback back cover copy or adapted for digital readers.
I selected English as the language, added my series information, and confirmed the categories (a topic for another article).
This duplication saves time as you don’t have to start from scratch or manually copy every field over.
Here is a second video showing the next steps across 21 minutes:
By the way, a Kindle eBook doesn’t have an ISBN number by default as Amazon differentiates them with their own ASIN. In my case I want to sell it also on regular eBook marketplaces and therefore assigned one of my ISBN numbers as mentioned above.
Step 6: Upload the Files
KDP requires two main files:
Interior file: the formatted epub file created earlier - it became the standard format read by most readers in the world.
Cover file: a JPEG image (not PNG) ideally at 1600 x 2560 pixels. You can have another aspect ratio but it would look strange on the shelf.
I confirmed in the uploading process that all images included alt-text descriptions for accessibility which is a requirement in Kindle publishing.
Test: Kindle Create vs. Calibre
Amazon offers a free desktop app called Kindle Create. It is simple to use, you only need to import your Word file and it automatically generates a Kindle-ready version, even as an epub file which you can use elsewhere.
The catch? Kindle Create strips out many design details. Covers don’t always display properly, fonts are standardised, and the Table of Contents can feel generic. For text-heavy novels it works fine, but for illustrated books like mine, the result looked flat and clunky. Just check at the 6:00 mark in the second video.
That’s why I turned to Calibre, another free tool that needs to be installed on the computer as well. Calibre gives you much more control over layout, fonts, and images. It allowed me to keep my chapter titles styled correctly, embed images where I wanted them, and ensure the eBook looked polished. Even the Table of Contents came out beautifully formatted.
The trade-off is that Calibre requires a few more setup steps, but the end result is a Kindle eBook that feels professional. See the difference at 10:30 in the video.
Step 7: Preview and Adjust
The KDP Previewer is where you see how your book will actually appear on Kindle devices. This is critical:
Check that chapter headings align correctly.
Ensure images scale properly and don’t break the flow.
Verify the cover displays as expected.
Only once the preview looks right can you move on.
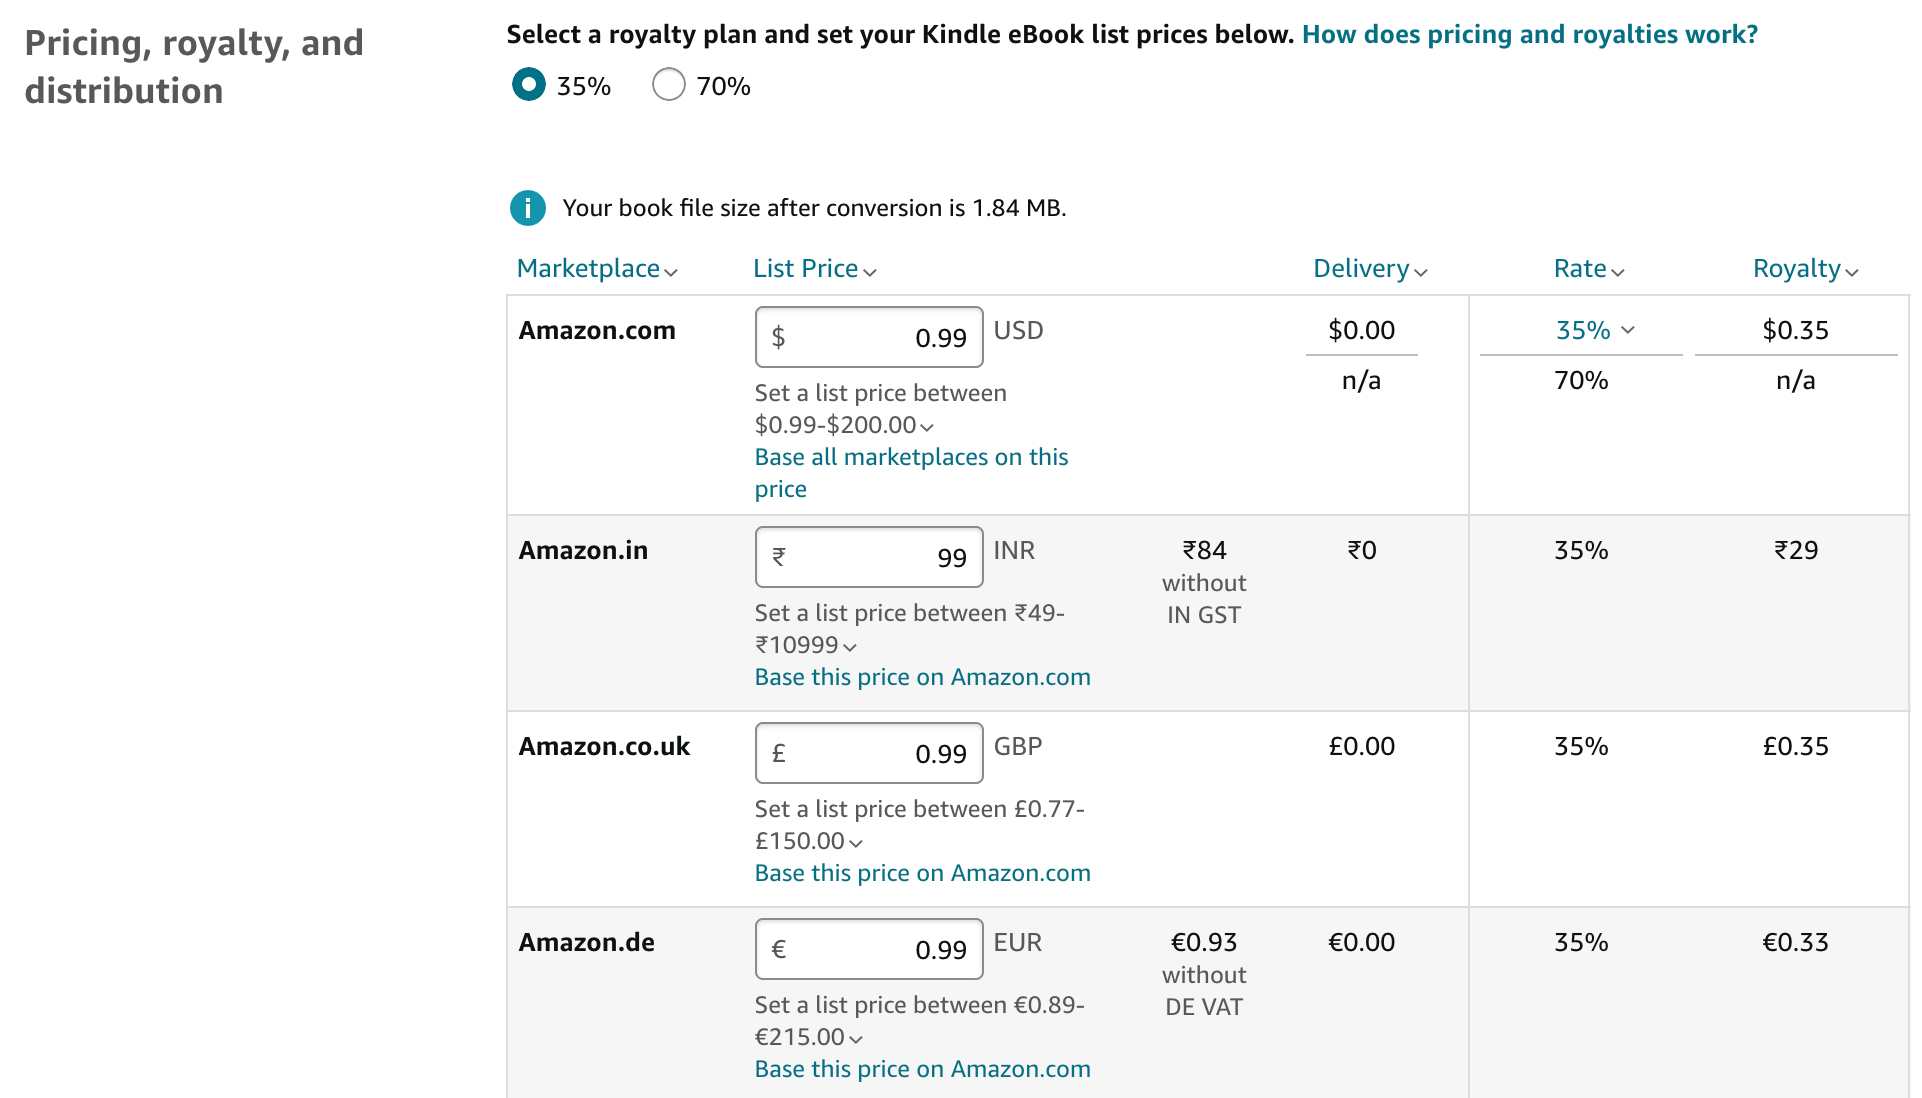
Step 8: Set the Pricing
Here’s where things differ from paperback:
For paperbacks, you enter a net base price and taxes get added.
For Kindle eBooks, the listed price already includes tax.
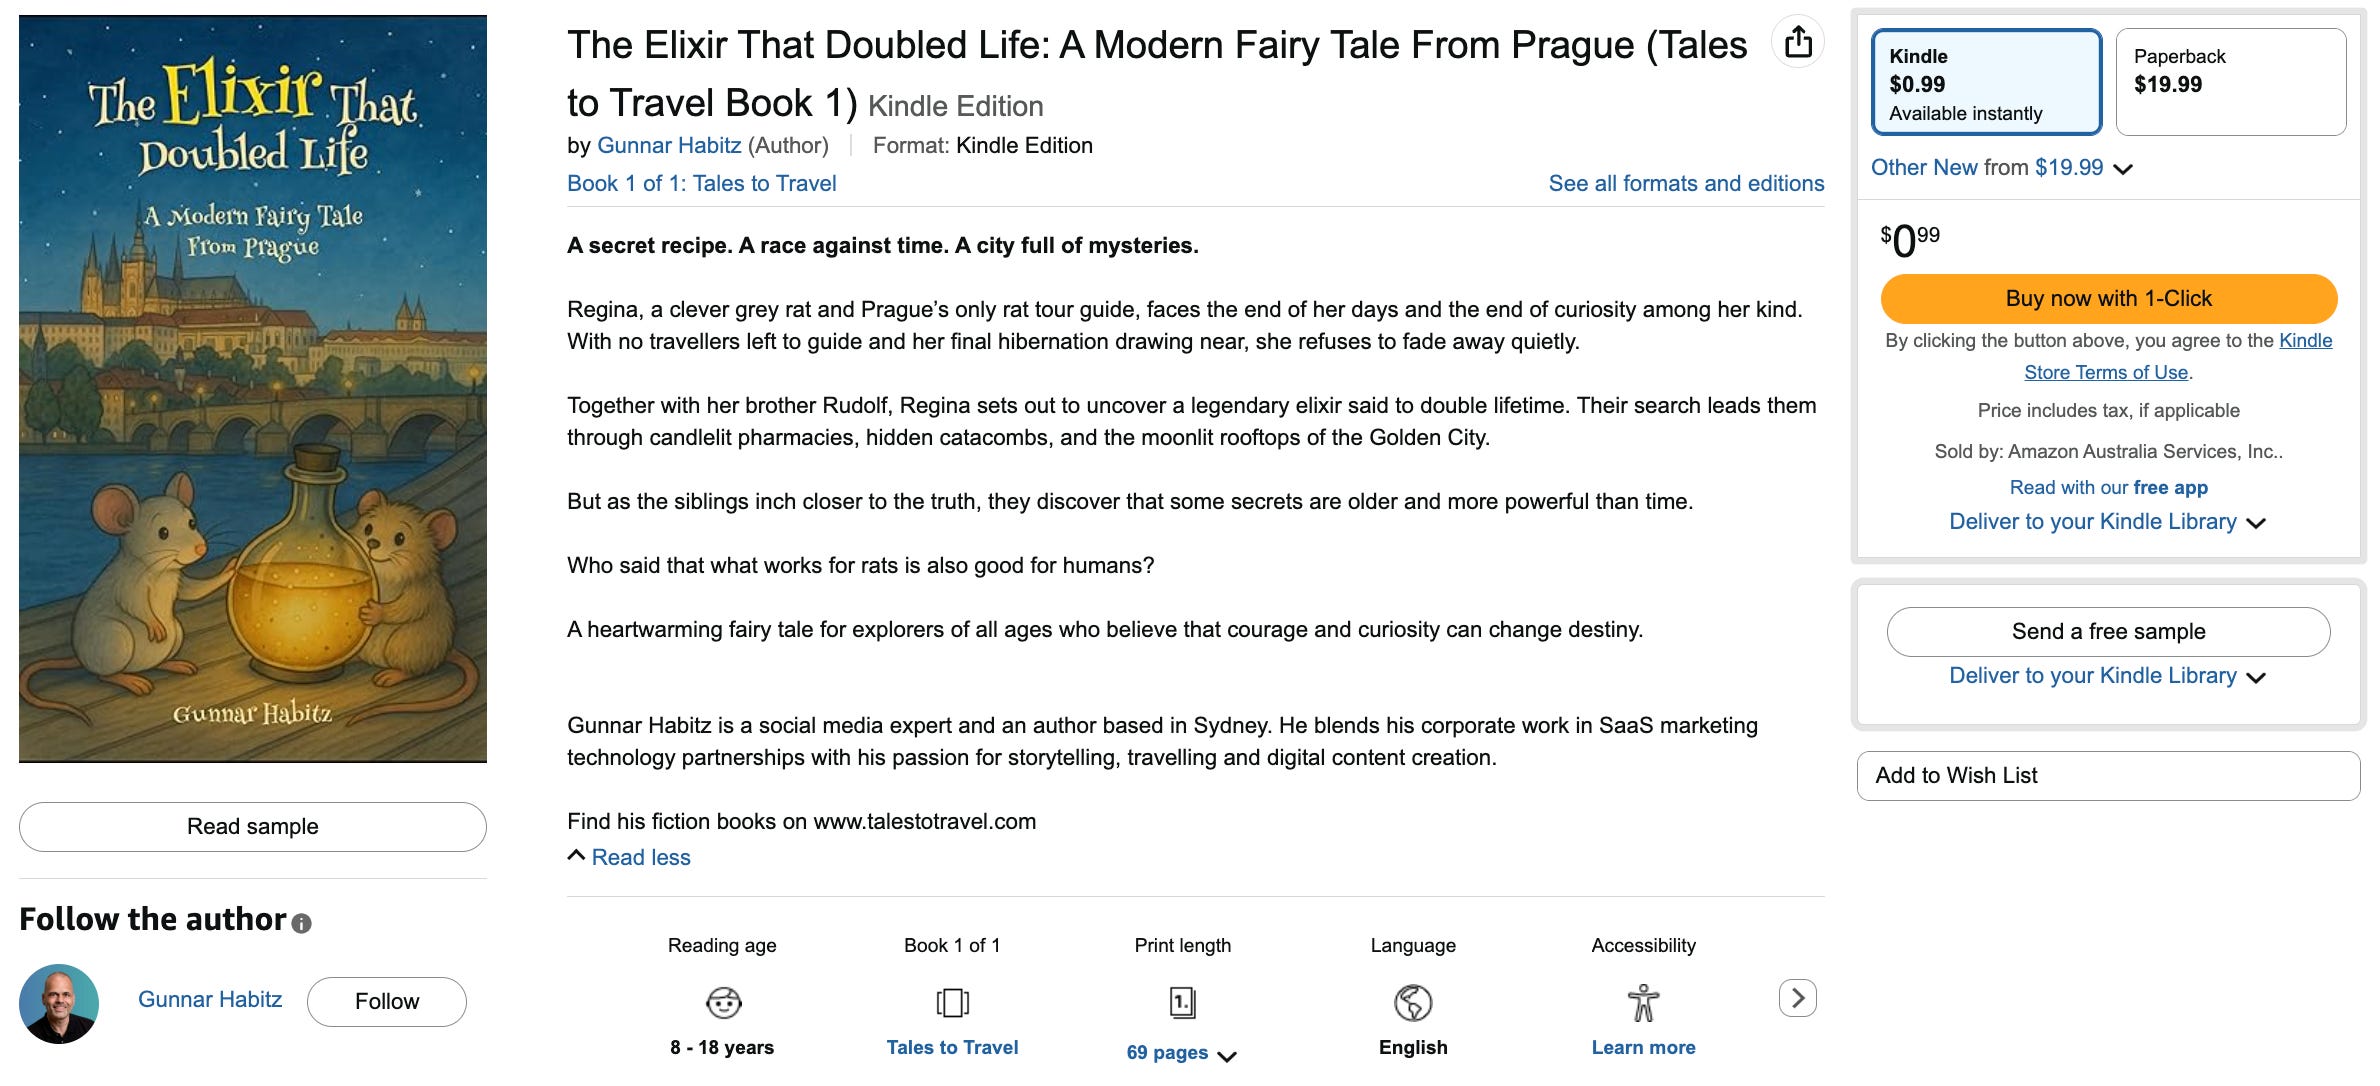
I experimented with different options, but decided to launch at $0.99 worldwide. The goal isn’t immediate profit, rather to build visibility and encourage early downloads. Later I can adjust to a more standard price like $2.99 or $4.99.
Step 9: Choose your Distribution
A few key decisions along the way:
KDP Select: I chose not to enrol in Amazon’s promotion program which allows for price dumps and giveaways which requires exclusivity for 90 days. That leaves me free to distribute through Draft2Digital or other platforms.
Territories: I opted for worldwide rights, no need to limit to certain countries or markets.
Royalties: KDP offers to options: at the 35% level they take transfer costs; it’s the only way to price as low as $0.99. At the 70% level the commission is higher but the author has to pay delivery costs which is tricky in my case given its large illustrated images.
Step 10: Publish the eBook
With files uploaded, the preview approved and prices set, all that’s left is to hit “Publish”. In my experience, eBooks often go live faster than paperbacks, often within 24 hours. In the case of this fairy tale book it was even less than five hours to see it appearing on Amazon!
👉 Check it out here: https://mybook.to/elixir (this is a universal link from Booklinker that diverts to the right market place of the reader).
Lessons Learned
Converter tools: Kindle Create is quick, but Calibre delivers a much more professional result for all type of books.
Covers matter: A separate JPEG is mandatory for Kindle, even if you already uploaded a PDF for paperback.
Think globally: ISBN ownership and pricing strategy give you flexibility across markets.
What’s Next
With both the paperback and Kindle eBook versions now live, my fairy tale is ready to reach readers in both print and digital form. The next step: Preparing the audiobook, that’s another learning curve entirely.
📚 Have you experimented with formatting, uploading, pricing or distribution strategies on KDP for paperback or eBook? I’d love to hear your thoughts.
👉 And if you need help for your book just let me know - happy to help!
very helpful, i'm about a tenth of the way through the process at the moment and you make it quite straight forward to see what is ahead beyond the actual writing
That's very useful, thank you Gunnar.